Hello once again, I am bringing you a topic many of you would love to read and learn about. Back in 2015, I did a topic on the 5 Do's and Don'ts for blog photography. (click here) to see the post. Then, I told you guys I am not very savvy when it comes to photoshop but I also told you if I find out any tips I will let you know. From that time to now, I have searched and watched many videos regarding to the topic. I stated in the post, that I do not own one of those lens that automatically do the background blur. I found my own way by playing around with photoshop. If you would like to learn more and get that background blur that you want, check these steps below :)
STEPS:
1. First, open up your photoshop. Pick any image you would like to blur the background. In my case, I picked my latest outfit post. Now, click on the third tool on your left side. Then click the Magnetic Lasso Tool.
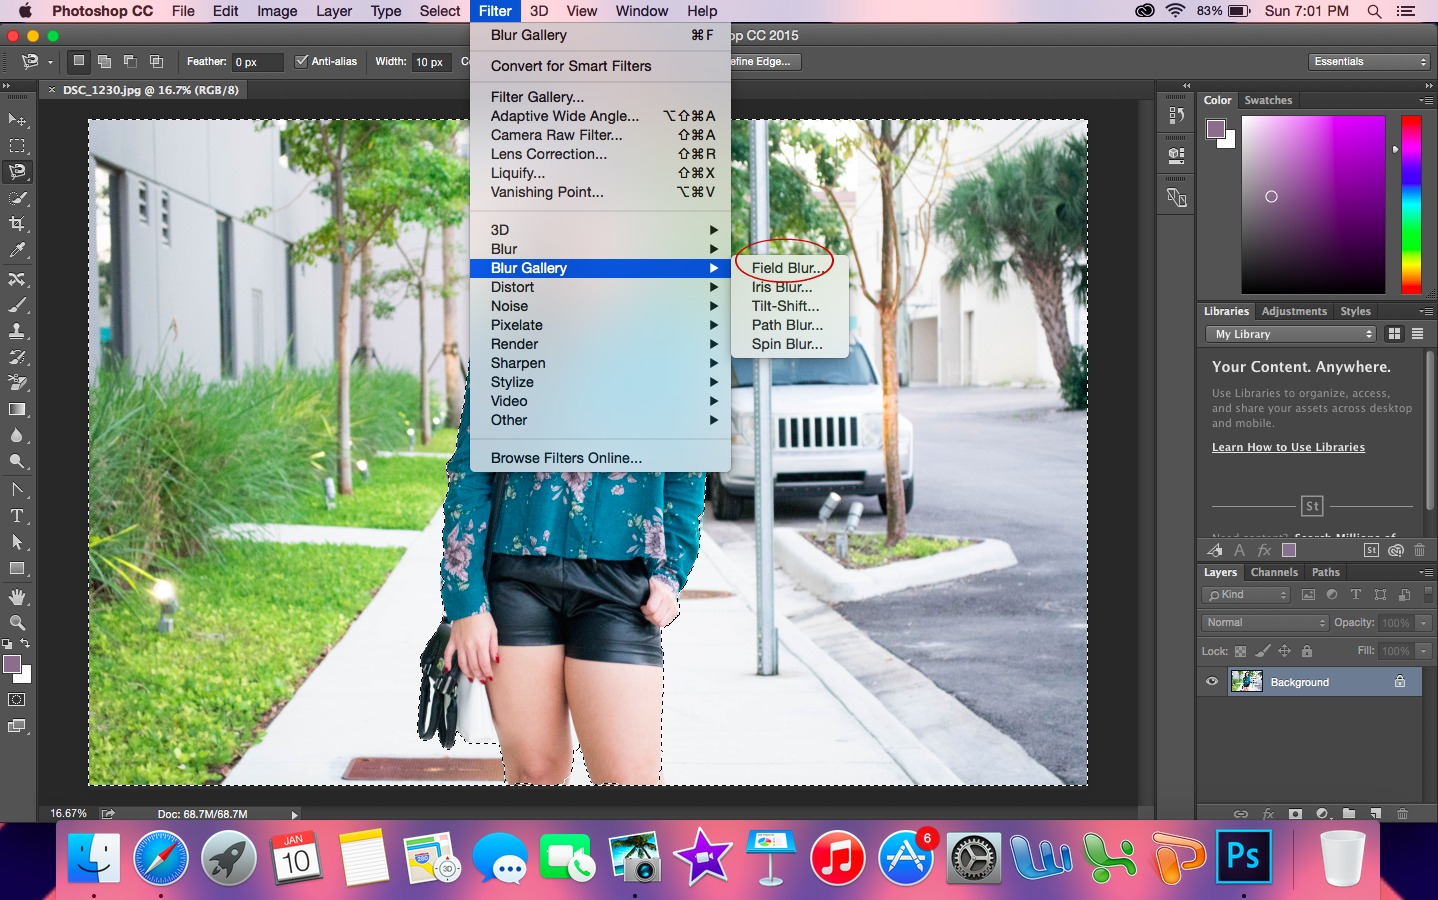
2. With the Magnetic Lasso Tool you will go around your body image/object. It will trace it for you but try to keep it as close as you can so you can get everything in place. If you do something wrong just click backspace and it will go back. Once you have everything trace, just click Enter.
3. To make sure we are not blurring ourselves/object, click on the top Select > Inverse
This will automatically pick the outside of the image instead of blurring yourself.

4. After the Inverse selection, Go to the top and click where it saids Filter > Blur Gallery > Field Blur.
5. On your right hand, you will see a new box come out which is the selected Field Blur for the picture. It usually starts at 15 px but I only went up by 5+ and I am very satisfied with 20px. If the picture would of been closer then maybe I would of picked 25px. I didn't want to make it seem like I edited so to keep it under the 25px is the best suggestion I can give you. If you think you want to have more blur then go ahead and adjust it the way you like just try to not make it fake or like if it is edited. After you like how your picture is, save it and enjoy your background blur. :)
FINISHED PRODUCT


laura--finally finding time to stop by this post!! ah ha!! thanks for sharing the photo tips girl, so helpful! xoxo,
ReplyDeletejanna | www.jannadoan.com
Great tips, I'm a newbie photographer but I don't use Photoshop anymore. Nowadays you don't need to have professional camera you can create such photos using the app for focus and blur https://macphun.com/focus this is unique solution for MAC users, try to, a little practice and I'm sure you can make the photos even better than this.
ReplyDeleteOh that's great! I am so going to look into it. Thanks so much for sharing :)
Delete